Writing Javascript Codemods and Understanding AST Easily
March 05, 2019
One of the big advantages when using statically typed language is ease of refactoring. Different IDE tools can easily rename class or method across hundreds of files with hundreds of usages. And given the nature of Javascript, some of the refactorings are hard, or even impossible.
Despite that, different tools, that modify or inspect Javascript code still emerge. And in some cases, they are even better than ones in statically typed languages ecosystem. Prettier, Eslint, React Codemods to name a few.
They all have one in common - they all analyze or modify parsed Abstract Syntax Tree of the code. Basically, AST let you traverse source code using a tree structure. AST is a general programming languages term and not specific to Javascript. I will not go into the theory about AST here, but I will show a concrete example of how to use it.
Notable tools and libraries
- AST Explorer - one of the most useful tools while learning. You paste JS code and see AST representation in different AST specs.
- jscodeshift - a tool by Facebook, that helps writing code modification scripts.
- AST Types - type specification on which jscodeshift is based.
- react-codemod - collection of scripts, written for jscodeshift that convert React code in different ways. There are some good examples to look into.
- js-codemod - Similar collection of scripts, that are not React specific. Also, help to learn by example.
Setting up codemod project for TDD workflow
Codemod is textbook sample where TDD works. You have an input file, you run the script and you get output. Thus I would really recommend using TDD for codemod projects. Not only it makes codemods more stable, but having projects with test workflow setup, will help you learn. Because you can experiment just by running the same test over and over again.
Here is how to create codemod project from scratch:
- Create empty npm project (
npm init sample-codemod) - Install codeshift
npm i -S jscodeshift - Install jest
npm i -S jest - Copy over test utils from jscodeshift library src/testUtils.js
- Modify
testTest.js, by replacingrequire('./core')withrequire('jscodeshift') - Create initial folder structure:
+-- src
|   +-- __testfixtures__  - put sample files for transformation, use suffixes .input.js and .output.js
|   +-- __tests__ -simplicity-in-technology.markdown
After that, you can create a test file and start adding tests. Test utils from jscodeshift allow you to create 2 type tests:
- Inline, where input and output is defined as string
defineInlineTest(transformFn, options, input, output) - Using files, where you define path to input and output files
defineTest(__dirname, transformName, options, testFilePrefix)
I have created a repo with this sample in Github.
Steps to create codemod
Essentially codemods could be oversimplified to just 2 steps:
- Find the tree node
- Replace with new one or modify
Since there are many ways to write the same logic in JS. You will need to think of all ways developer could write the thing you want to replace. For example, even finding imported value is not that trivial. You can use require instead of import, you can rename named import, you can do same import statement multiple times and etc.
At start I would suggest to think only about the simplest case and not think about edge cases. That’s why I think TDD is essential, you can gradually add more complex cases, while not breaking initial functionality.
Sample codemod
Let’s write simple codemod using this workflow. First let’s define a simple test case, as we are trying to work with TDD.
We want to convert this:
export default (a, b) => a + b;into:
export default function (a, b) {
  return a + b;
}
If we are using file approach for jscodeshift. It would be defined this way:
describe('arrow-to-function', () => {
    defineTest(__dirname, 'arrow-to-function', null, 'defaultExportedArrow');
});
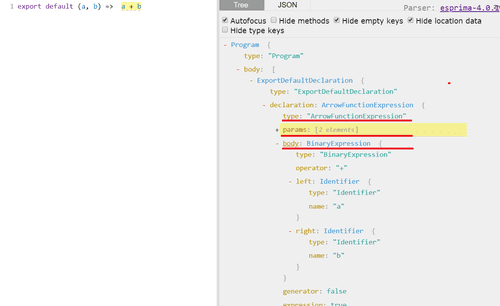
Once we have this sample, we can launch AST Explorer and inspect how to input code is parsed as AST (make sure you use esprima spec):
From explorer it’s clear that we need to find the node of type ArrowFunctionExpression. And based on the highlight, we care about arrow function body and params fields.
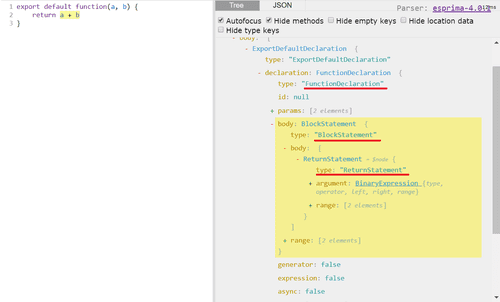
After analyzing what to find, we also need to find out what we need to build, here AST explorer helps as well. Just paste output code to it:
From the structure, it’s clear, that regular functions are a bit more complex. We need to add a block statement and return statement.
Let’s start with finding arrow functions. To create codeshift transformation you need to create file and export single function. That function will receive three arguments: fileInfo, API, options. Currently, we mostly care about api.jscodeshift (usually, it is defined as j) and fileInfo. Finding all arrow functions is simple:
module.exports = function transform(file, api) {
  const j = api.jscodeshift;

  j(file.source).find(j.ArrowFunctionExpression);
};
This will return the collection instance, which we can iterate and replace nodes. Let’s replace all arrow functions with regular functions:
module.exports = function transform(file, api) {
  const j = api.jscodeshift;

  return j(file.source)
    .find(j.ArrowFunctionExpression)
    .replaceWith(p => {
      const nodeValue = p.value; // get value from NodePath

      // whole node will be replaced with newly built node:
      return j.functionDeclaration(
        j.identifier(""),
        nodeValue.params,
        j.blockStatement([j.returnStatement(nodeValue.body)])
      );
    })
    .toSource();
};- Each item is an instance of
NodePath, which allows you get parent node, therefore in order to access actual node you need to usep.valuefield. - If you access jscodeshift field starting with uppercase, it will return type (
j.ArrowFunctionExpression). It is used to filter and check nodes. - If you access jscodeshift field starting with lowercase, it will return build instance. Which allows creating code blocks. Check AST Types repo to see what fields are supported using each builder. For example, if you would open
core.tsfile and look forFunctionExpression, it has following definition:build("id", "params", "body"). Which means that you need to pass id, params, and body.
And that’s pretty much it. If you follow these steps, it’s not that hard to write more complex codemod. Just constantly check AST Explorer and gradually you will become more familiar with the structure.
Further improvements
The current implementation is extremely naive and should not be run on actual code base. Yet, if you would like to work further on this example to learn, here are some suggestions:
- Handle arrow functions with block statement
{} - Do not convert arrow functions that call
this. Arrow functions handlethisdifferently and current codemod would break working code. - Convert arrow function declaration into named functions, for example
const sum = (a, b) => a + bcould be converted to named functionfunction sum(){...}
Running on codebase
I have mentioned previously that this code should not be run on the real codebase, however, if you would build fully working codemod, here is how to run it:
npx jscodeshift -t script-path.js pathToFilesDealing with complexity
- Extract custom predicates. For example, if you are dealing a lot with JSX, you might create predicates like
hasJsxAttribute,isNativeElement, etc. - Extract builder functions. If you keep creating import statements, create a function that would return the node with the import statement.
Using Typescript
It takes a bit of guessing when using jscodeshift API if you are not familiar with it. Typescript can simplify this process, it works with AST Types mentioned at the start of the post. With Typescript it’s a bit easier, to guess what parameters to use in a builder, or how to access certain values. However since parsing is really dynamic in nature, time saved by getting type info is sometimes lost dealing with Typescript type system and defining types manually.
Jscodeshift recipes
Here I will share some code snippets, that might help you do some tasks while writing your own codemod. They are not 100% error prone, but at least they show some different modifications you can do.
Create function call statement
// will generate this:
const result = sum(2, 2);

j.variableDeclaration('const',
    [j.variableDeclarator(
      j.identifier('t'),
      j.callExpression(j.identifier('result'), [j.literal(2), j.literal(2)])
    )]
  );
Find imports in file
function findImportsByPath(j, root, importPath) {
    const result = {
        defaultImportUsed: false,
        namedImports: []
    };
    root.find(j.ImportDeclaration, (node) => node.source.value === importPath)
        .forEach(nodePath => {
            nodePath.value.specifiers.forEach(specifier => {
                if (j.ImportDefaultSpecifier.check(specifier)) {
                    result.defaultImportUsed = true;
                } else {
                    // specifier interface has both local and imported fields
                    // they are the same unless you rename your import: import {test as b}
                    result.namedImports.push(specifier.imported.name)
                }
            })
        });
    return result;
}
Rename JSX attribute
function transform(file, api) {
    const j = api.jscodeshift;

    return j(file.source)
        .find(j.JSXAttribute, n => n.name.name === 'class')
        .forEach(nodePath => {
            nodePath.node.name = 'className'
        }).toSource();
}

